Subwoofer isolation pads – Do they make any sense?

In my previous article on my experiments with my hybrid Sonos setup I alluded to trying out isolation pads for subwoofers. These are typically a dense foam base which has a soft fabric covered plywood sheet on the top to hold the subwoofer. The idea is to absorb speaker vibrations and prevent them from transferring into the floor and causing resonances.

Question is do they make any sense or are just snake oil just like so many other stuff in the audio world. The only way for me to determine this was to get a couple of these, test and measure and return if they made no difference. So, did they make a difference for me eventually? Yes, I am keeping those. Should you get one ? It depends!

In my hybrid Sonos setup I have two Subs. One a Sonos Sub and another an OSD Trevoce 10” Sub carefully DSP tuned to complement the Sonos sub. Even after lots of tweaking of settings and DSP, furniture and speaker adjustments there was a slight nagging boominess to the bass. Costly room treatments were not an option, especially in a rented apartment. After researching a bit, I ordered two Auralex Subdude II isolation pads which subjectively, made the boominess disappear with tighter bass. However, I wanted to measure with REW. REW is not subject to placebo effects so I hoped to get an objective picture.

Note here that the Sonos Sub has two opposing force-canceling drivers resulting in negligible vibration of the subwoofer cabinet but some energy still transfers to the floor from direct contact. The OSD Sub has passive radiators but they are not force-canceling, so it does vibrate. Note also that I have a carpeted floor so carpet should absorb some vibrations from the subs. I was interested in the Decay graphs from REW to understand the extent of resonance/ringing per frequency range. I decided to use the spectrogram graph type as it shows decay times independent of peak volume levels. My measurements were all volume matched to 75Db SPL for Pink Noise. The spectrogram is a view of the waterfall 3D graph from above.

I took two measurements, one without the Auralex pads on both subs and one with them. My first measurements showed reduced decay times, albeit small, but across the entire frequency range! This was very surprising to me. I was only tweaking the subwoofer setup, so how can it impact the higher frequencies. I could not believe those results and was confused. I could not clearly recollect if I had done something odd or maybe even changed the settings in the middle, or it could be differing background noise. So, I used the setup for a few days and took another measurement on another day at a time when things were uber-quiet and there was only me at home. I took two measurements in quick succession with and without the pads and was very careful to not affect anything and ensured background noise was minimum. I got the same result! So, I measured yet again and once again got the same result!

The following is a spectrogram overlay that compares the decay times. Click on the image for a bigger clearer picture. All measurements were taken from the Main Listening Position or MLP for short. I used a UMIK-1 and it was pointing straight. I did not use the 90 degree config. I will try that another day. Maybe, it will pick up the reflected sound better and show a bigger difference.

Spectrogram boundary in white = measurement without Auralex pads. Inner rainbow colored spectrogram = measurement with the pads.
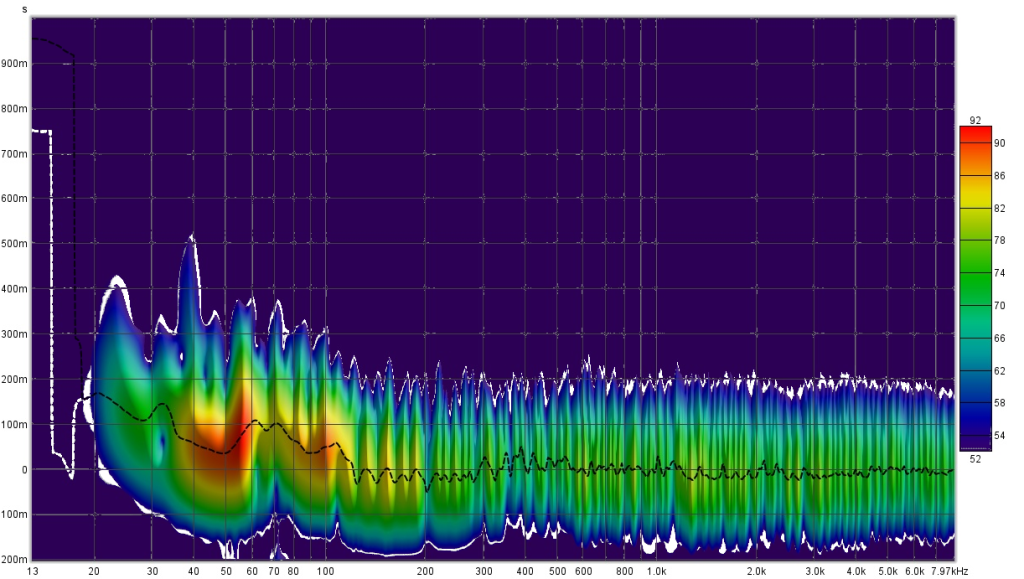
The vertical axis is decay time. It is clear that the inner spectrogram has smaller decay times across the frequency response. The benefit is small, but it is present even with my carpeted floor and subjectively audible. Human hearing is very sensitive to timing changes, reverb, echoes etc. So how is this working? I suspect a few things:

  • The Auralex are doing their job at the lower frequencies.
  • REW does a frequency sweep so, I suspect the previous frequency’s decaying tone is affecting the next in the range. But this still does not explain the benefit at the higher frequencies much beyond the time of the lower frequency decays.
  • I live in an apartment, on the second floor and the building is made of wood and synthetics (drywall for eg). There is no concrete. So vibrations, even minor ones are transmitted easily.
  • The subwoofers are kept just next to my bookshelf speaker stands that have metal spikes into the carpet. So, the isolation pad foam are likely absorbing higher-frequency vibrations through the carpet transmitted to the floor via the stand.

So, finally the question, should you get an isolation pad? Considering the following questions can help:

  • Do you live in an apartment? If yes then it can make some sense to avoid trouble with your neighbors.
  • Is the building made of concrete or wood? Obviously it makes more sense in a wooden construction.
  • Even in a concrete building do you have a wooden floor?
  • Do you have a carpet? Wooden floor with no carpet and it makes more sense to get an isolation pad for your sub.
  • Are you living in your own house, possibly concrete construction and have a carpet with audio setup on the ground floor? Though it will make hardly any difference to the sound, you can still get one for mental peace, especially if you have OCD like me!!
  • Do you have room treatments like acoustic panels and bass traps? Please still buy these isolation pads because they are another fancy item to talk about and show off your deep knowledge of room acoustics to friends and family…

Caveats

Well, the last two jokes apart, there is some sense in getting these pads based on your situation as is clear from the remaining points and the earlier discussion. However, one thing I could not measure is how much floor and wall vibrations were present before and after. Measuring that accurately with enough sensitivity requires expensive equipment. The free smartphone based apps are likely not sufficient here. Subjectively, listening to music from outside my apartment, the low frequency effects did sound lower at the same volume. Also, my measurement microphone was horizontal, pointed towards the speakers. I later learned that it is recommended to point it upwards and use the 90 degree calibration file to better assess room effects.

My experiments with Sonos – 3

Obsessed with quality

When I was in my early teens, I remember developing a taste for the sound of music. Theaters and concert halls would mesmerize me not by the large screens or stages but by the sound and the large speakers! I was more interested in the way audio was being produced and delivered. If it was audio, it had to be well-presented. I would balk at the tinny or boomy sound of small cassette players and two-in-ones. It was the same thing with my father. If he did not have the right equipment, he would not listen to music, period!

My first experience with hi-fi was amplifiers and speaker enclosures designed and built by my dad. Electronics was his hobby and I would watch intently, and sometimes help as he painstakingly soldered components, screwed boards, cut and drilled plywood etc. He ended up making several mono amps and speaker boxes for friends and family. Unbeknownst to me he was saving up all this while for something bigger. It was an exciting evening when he walked in with three big boxes and unboxed the Sonodyne Uranus. A top-tier component hi-fi system of that time.

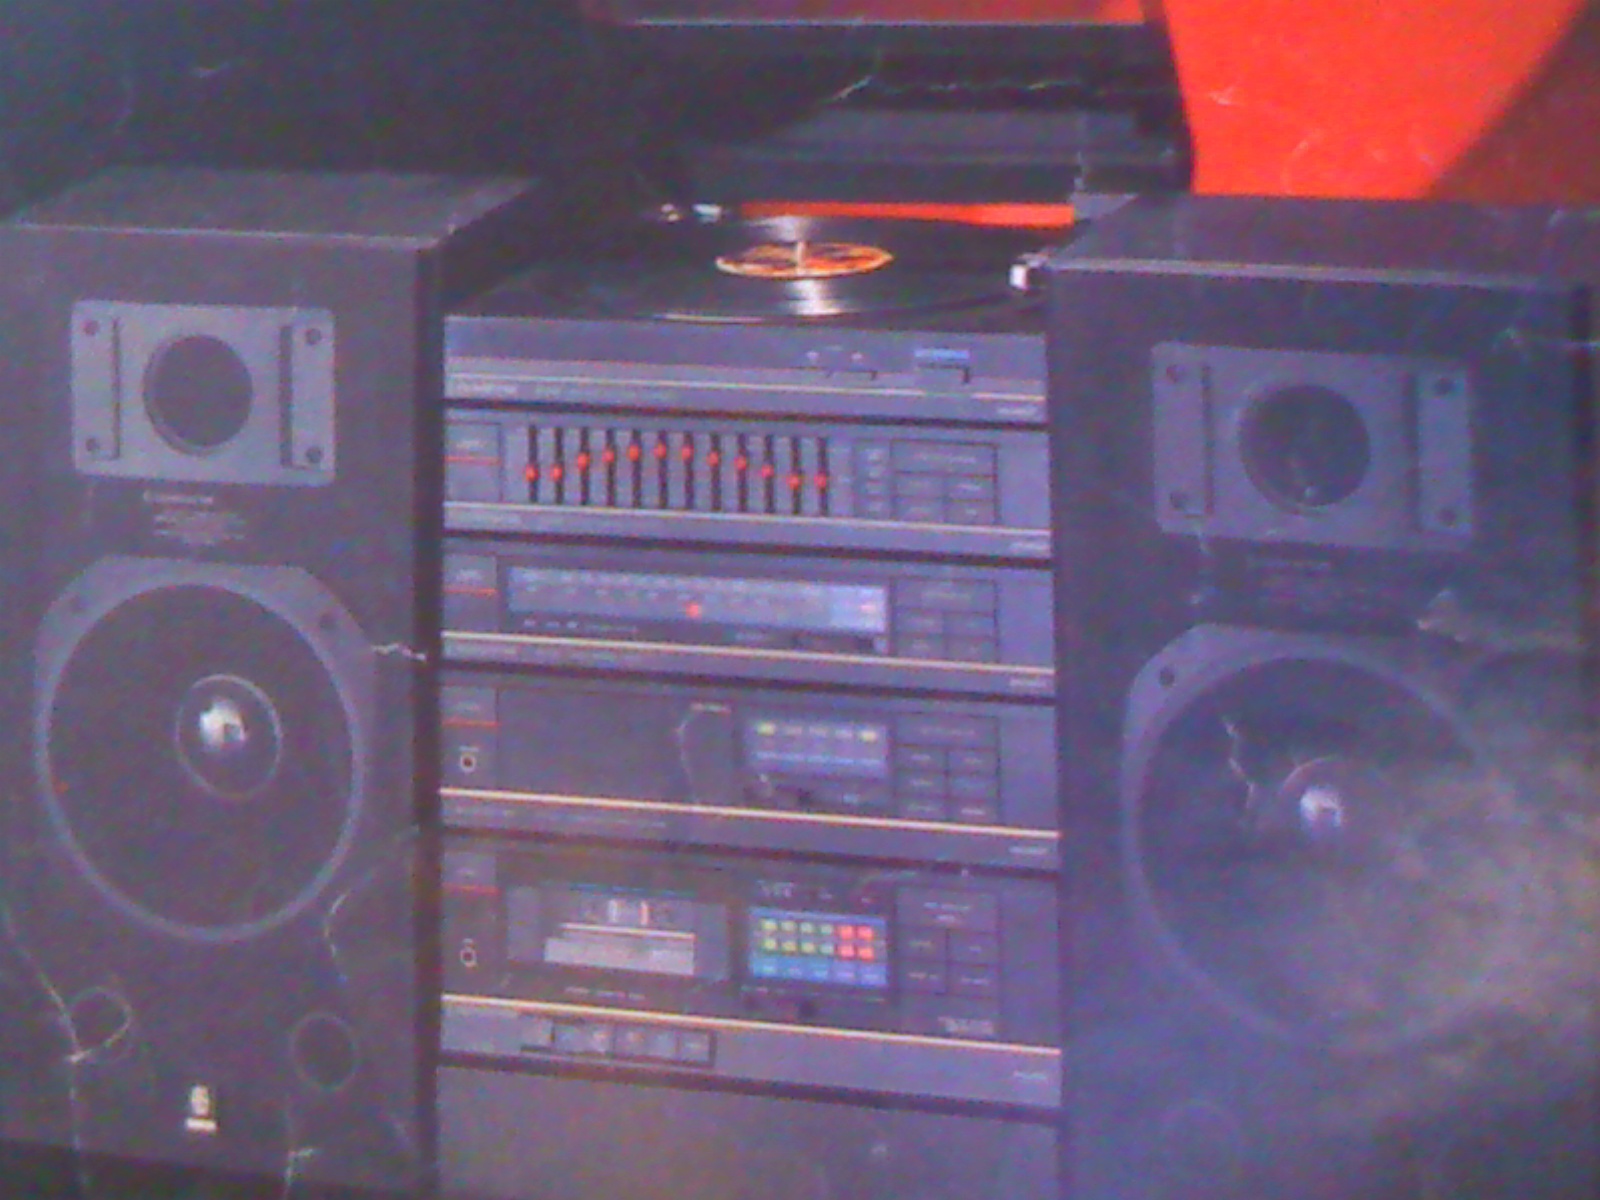
It had a discrete cassette deck, 12-band graphic equalizer (+/- 12db), AM/FM tuner, turntable and a power amplifier employing the STK 4131-II chips. It also came with two or three way bass reflex speakers. That audio obsession has been with me to this day. I am unable listen to music unless the presentation reaches some level of finesse. I have gone years without listening to music when situation did not permit me to invest in proper audio equipment. A cursed obsession you might say! That also means then even when I acquire equipment, I spend a lot of effort in tweaking the systems and the rooms in search of qualitative improvements. While the effort is large, the rewards are large to my ears as well. I find myself listening to more music as I get to that level of desired perfection. It is an inflexion point of quality and diminishing returns given a certain budget.

Measure – tune, measure – tune, measure – tune

Coming back to my hybrid Sonos system of the present, it was great but there seemed to be something missing. Playing back music from 90’s era movies, it seemed the drum beats were weak. The punch was missing. I cannot listen to music like that. At that point I realized that I had to measure it. A bit of recollection and research led to the following:

I needed some additional stuff since I had to connect my laptop to the Sonos system. I could connect it to either the Arc or the Amp, but in either case those needed HDMI ARC. Sonos provides an optical to HDMI ARC converter cable. So, I had to figure a way to convert laptop USB to digital optical. Such a thing was hard to find but I eventually found a USB DAC that replicated the USB digital signal onto optical as well as line-out. So these were the additional things I had to get:

So, I was able to connect the DAC to my laptop’s USB, connect the Sonos optical to HDMI cable to the DAC’s optical input on one end and the HDMI cable on the other end. The DAC replicates the USB input signal to the optical input as well making the optical input also behave as an output. Finally, I plugged in the HDMI cable into the Amp’s HDMI port. Playing youtube confirmed that it works. Sound was coming through the Amp’s speakers and there were no lip-sync delay issues.

The first hiccup came when I grouped Amp with active HDMI-in with the Arc. The Arc sound was delayed resulting in a bad reverb! This is the Sonos 75ms group audio delay. Interestingly, the group delay is not present when connecting via the Arc’s HDMI port and grouping the Amp. After a bit of fidgeting I got rid of the delay by adjusting the Amp’s “TV Dialog Sync” setting. I could’ve just used the Arc’s HDMI port but messing around leads to more learnings.

Anyway, I stepped through the video and made my first test measurements to understand the process and verify that everything works. Now, I was ready to do some real work. First I had to get my surroundings as quiet as possible:

  • Close all doors and blinds
  • Shut off the water dispenser and refrigerator
  • Somehow get unhappy wife and kid into a bedroom and get them to be absolutely quiet
  • Pray the neighbors do not make sudden noise like closing a door loudly
  • Pray no vehicles enter or leave the apartment parking
  • Pray neighbor’s dogs do not bark
  • Pray …

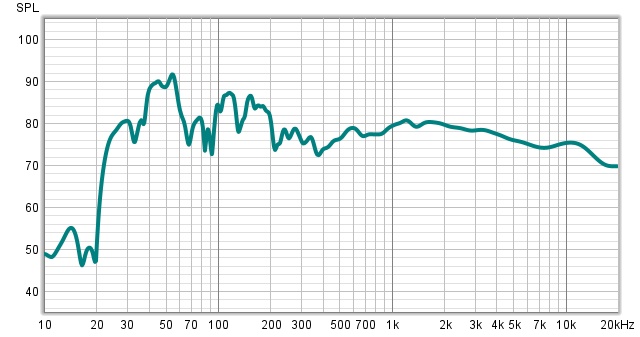
My first measurement was only with the Arc + Ones + Sub setup. The Amp was not grouped and not active. This setup was tuned with Trueplay:

z

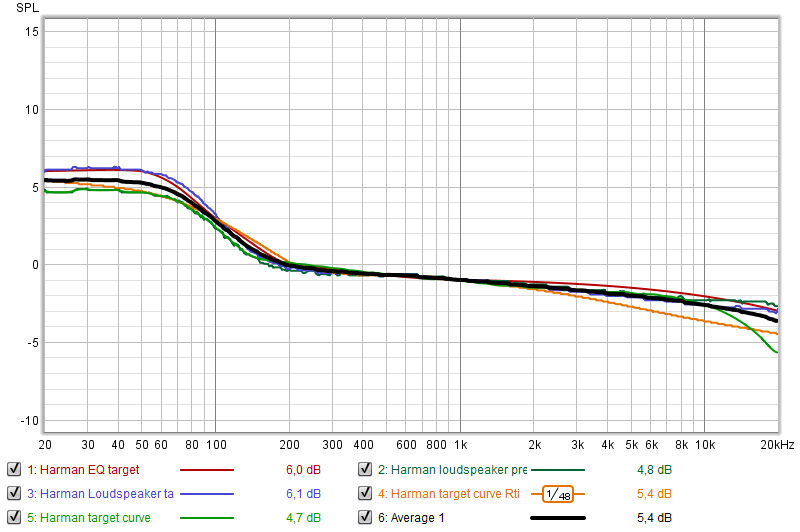
As you can see. I have a bad living room in terms of acoustics and Trueplay room correction DSP is no magic. There is a lot to be desired in the Bass frequencies below 200Hz. The peak at around 50Hz looks like a room mode. Now here, I have to mention that I am not looking for a flat frequency response. There is some controversy around this topic but to me a flat frequency response is incredibly boring. It is more desirable to go for a Harman Curve. While Harman curves were initially designed for headphones we also have them for loudspeakers. Example:

Next I measured the Arc+Amp grouped setup with Amp crossover set at 96Hz.

Not much difference in the bass as the Amp does not have a sub. It only has the Q Acoustics 3030i bookshelf speakers. But 100Hz – 200Hz is a little more fuller and the midrange from 1KHz to 4KHz is boosted resulting in clearer dialog in movies. I figured maybe letting the Q Acoustics handle a bit more bass would help with the dip at 60Hz to 100Hz. They are rated till 46Hz. Reducing the crossover to 70Hz yielded this.

x

Notice the little bump from 70Hz to 90Hz. So the Q Acoustics were helping a bit in that range. Also the spike at around 50Hz has reduced a bit. It is looking more like a Harman but still quite jagged. At this point I was out of options to tweak further with the existing system as Sonos has limited EQ capabilities. Two further next steps were possible:

  • Adjust room setup – my living room was congested and needed some cleanup and re-alignment.
  • Add a subwoofer to the Amp, preferably one with a built-in parametric EQ so I can adjust the response.

Eventually, I did both. The sofa was better aligned with more frontal space. Got rid of some old stuff, repositioned some other furniture. I saved up and splurged on the OSD Trevoce 10” EQ DSP Subwoofer. This subwoofer comes with some advanced DSP features including a 25-band parametric equalizer. Optimal Speaker Design or OSD for short, typically designs outdoor speakers but recently have been getting into home theater audio. While SVS is a more popular and respected subwoofer brand, I read some reviews of this less-known sub, especially the sound and vision review and grabbed it for its DSP features. I was not disappointed. SVS subs only have a 3-band parametric EQ and in the end I needed to use 12 bands on the OSD to get some results.

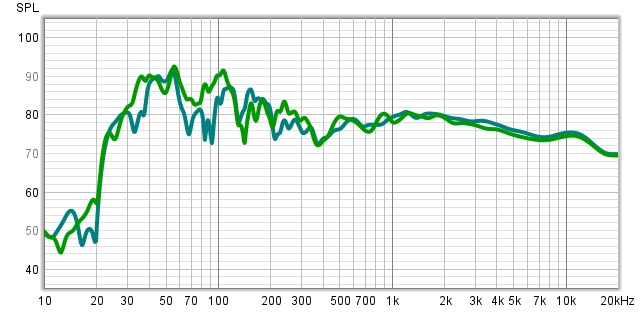
In the meantime my wife was a little upset with a second sub in a small apartment and thought I am losing my sanity with the repeated microphone setup and crazy measurement sessions for hours. That the speakers made all sorts of booming and squealing sounds during the frequency sweeps did not help! To make a long story short after days of tweaking, measuring, tweaking and countless parametric EQ curves later I had something which looked better on the graph and sounded better. Towards the end of the measurements, for the first time I could hear some glass items rattle. I was getting better bass extension down to 25Hz, thanks to the OSD Trevoce. The next graph shows the dual-sub setup with earlier response – deep green and new response – light green.

x

As can be seen, bass response is fuller and meatier with extension down to 25Hz. I had to adjust the Sonos sub level down by -1 to avoid a bad down-spike null at 46Hz. It seems at some volume 46Hz frequencies from both the subs coupled with room resonance were canceling each other out and losing energy. Just a bit of level adjustment gets rid of that effect. But I still had boomy sound.

The graph in light green is still not great however, even though it is closer to my desired room response curve. The peaks that 55Hz and 106Hz are too forceful. Also, while listening, it sounded quite boomy and reverberating along with too much sound pressure even at lower volumes. At that point I realized that I had the “Loudness” feature enabled on the Sonos Amp. This loudness is a DSP that boosts certain frequency ranges to improve listening at lower levels. In this case though my Subwoofers DSP was already doing quite a bit of work, so adding “Loudness” was an overload. Maybe okay for an all-singing, all-dancing party mode but not for general listening. Turning that off yielded a much better result with boominess significantly reduced. The next graph shows same setup with “loudness” off and Sonos amp crossover at 110Hz.

The bass is better controlled but we do have two drops at 73Hz and 128Hz. The next graph is a comparison, loudness on – violet, loudness off – deep blue/indigo.

You can see which frequency ranges are boosted by the Sonos “Loudness” feature. At this point getting rid of the two drops at 73Hz and 128Hz while still keeping bass under control will require room treatment with sound absorbing panels and bass traps to control resonance. I am not inclined to do that in a rented apartment, especially when I am going to move in future.

A better view of the boominess or sound ringing in a room can be seen via a 3D waterfall graph which shows the frequency tone decay over time in ms. I generated a Waterfall Overlay: White – Loudness OFF, Orange – Loudness ON

We want to have a decay time (Z-axis) to be as low as possible, less than 300ms ideally and at least less than 450ms. In this image you can see that the Orange overlay with loudness ON had much more forceful bass and worse decay times compared to loudness OFF in white. We still have some bad decay around 40Hz and nearby in the white graph. It is just my living room resonances at certain frequencies that can only be dealt with by bass traps/absorbent panels.

There is another thing here. Most subwoofers vibrate. Some like the Sonos Sub and some KEF subs have force canceling opposing drivers that have minimal vibration, but still it is not nil. The OSD sub that I got does vibrate quite a bit. All that vibration passes to the floor and walls especially in an apartment and especially in one which is constructed of wood and synthetic materials. That contributes to room resonances/ringing and annoys neighbors. So, I plan to get subwoofer isolation bases that absorb vibrations using an acoustic foam layer and make some measurements using those.

Needless to mention, I learned a lot during this exercise and thoroughly enjoyed it. It is surprising how little changes can have a big impact and how it can be tricky sometimes to balance dual-subwoofers especially if they are of different makes. However, the real enjoyment is the resultant audio quality when you start to re-discover your existing music collection and start to discern sound effects and instruments you have not noticed before.

My experiments with Sonos – 2

Adjusting front L/R crossover on the Amp without a Sonos Sub

After my initial setup and tweaking with the grouped Sonos systems with Q Acoustics speakers, I put it through its paces with a variety of music like Pop, Indian – Bollywood, Indian – Classical, Rock, Disco, Jazz, Oldies, Western Classical etc. I also tried out a few movies with Atmos soundtracks. It was great, but after a while, there was a nag.

The bass at certain frequencies felt too powerful with an edge of boominess. It was not evident always and depended on the soundtrack producing those frequencies. It was somewhat in the mid-bass range. In those cases it actually seemed to overpower some of the midrange and even caused me a bit of fatigue with bass-heavy music.

I was going to tweak the usual bass, treble and sub audio controls when it occurred to me that the Q Acoustics and the Sonos Sub in the Arc group had bass overlap. I had alluded to this in the earlier post but did not pay much attention at that time. The Q3030i can go down to 46Hz while Sonos Sub in the Arc group likely crosses over at a relatively high 96HZ – 100Hz range. This is based on what I read elsewhere. So, we have a significant overlap among the two speakers that is making that range overly powerful. The Q3030i are two-way bookshelf speakers so, if I could set a low-end crossover, it will take the bass load away and let their woofers handle midrange better. Once set, a crossover also adds a high-pass filter to the front speakers to block any frequencies below the crossover point reaching them. The Sonos Amp lets us set a crossover, but only with a subwoofer connected to the Amp. In my setup as described in the previous post, I have the Sonos Sub bonded to the Arc along with surrounds in a 5.1.2 configuration. The Amp is setup as a stereo. Unfortunately, the Sonos Amp tries to be smart and does not provide a crossover control if a subwoofer is not connected to it. I was not going to get another Sub for the Amp just for this!

So, I started looking for possibilities for a dummy subwoofer like load. The Sonos Amp sub out is an RCA line-level output that needs a powered sub. After quite a bit of digging this PAC LC1 RCA level control seemed like a good candidate that puts a 50K ohm dual gang potentiometer across the output. However, I also read that the Amp just tries to detect a connector on the RCA sub out. That means that an even cheaper simple RCA cable should also work. I eventually decided to get a 3.5mm female to 2RCA male audio cable. I had a cheapo powered computer speaker lying around. So, if plugging in a cable did not work, I could then simply connect my computer speaker’s 3.5mm input jack to this to provide an actual load. The speaker will be off and not producing any sound. Interestingly, plugging in just the cable actually worked! The crossover control popped up in the Amp’s Sub Audio section in the Sonos App.

This allowed me to experiment with different crossover settings. I tested the Q3030i speakers alone first, without grouping with the Arc surround to identify the effects of the crossover. The Sonos app allows to easily toggle the Sub audio on or off and made it easy to compare the effect of the crossover. I used some bass-heavy music for testing and eventually settled on a crossover frequency of 96Hz. I also set the Amp’s sub audio level to the minimum of -15. I was not trying to get an actual sub output on the Amp, just wanted the crossover control. The difference was not huge but the effect was quite clear. Taking out all the bass below 96Hz from the Q3030i immediately made them more clearer and detailed with the midrange. It seemed as if a small valve had been opened allowing more clarity through. The woofers are not having to deal with the heavy lifting below 96Hz. I grouped them back to the Arc set and then tested with movies. Dialog was much clearer and distinct. Both vocal and instrumental music showed differences. That slight boominess had disappeared. Explosions still rocked (thanks to the Sonos sub) but with tight control.

The journey still continues. I am having fun and learning a lot of stuff while also enjoying all the music along the way.

My experiments with Sonos – 1

How I got discrete front left and right speakers with a Sonos soundbar

I stumbled into Sonos quite by accident. My older 5.1 system with KEF speakers and Denon AVR was donated within family. In any case there were multiple other life changes including a major relocation, for which reasons it had to go.

When setting up my new rented apartment in a new place, we realized that the sleek flat Samsung LED TV sounded dismal! It was tinny with hardly audible dialog, even with the volume cranked up. I was not ready to get a new AVR and speakers plus all the wiring in the rented apartment due to large upfront budget requirements and huge hassles with shifting to a different place. Thus came the idea of a soundbar as a temporary solution. Further research led me to Sonos as a reputable brand with high-performance soundbars like Beam, Playbar etc and wireless multi-room capability. Eventually, I settled on the Beam and it turned out to be a great choice. I did not expect much from a soundbar but the Beam surprised me with its performance and sonic quality. I figured I could extend it later with a Sonos Subwoofer and then surrounds, all wireless to get a 5.1 system. The system is modular and clean. That appealed to me. Over the next two years I judiciously saved up and utilized credit card points to first grab a Sonos Sub and later two One SLs as surrounds piecemeal, till I had a 5.1 system. Setup and operation were painless and the TruePlay room correction (similar to Audyssey in the Denon) really made a difference. Sound quality was awesome for TV and movies but not quite there for music. It was good but with a small soundstage and lack of body.

I continued to follow Sonos developments and eventually upgraded to the Arc soundbar a year later, to get to 5.1.2 which include Dolby Atmos height effects. The Arc was awesome for movies but music performance kept lagging. In fact the Beam was better for music in some ways than the Arc. Ultimately, good as they are, these systems are based on soundbars which have a bunch of drivers crammed into a narrow enclosure. Physics, puts hard limitations. I love to tinker with tech and started digging about whether I can add different speakers as discrete front left and right units which will work wonders for the soundstage and could be used separately for stereo music. Sonos does not have this capability yet, though it is oft-requested by many Sonos users. After a lengthy research I figured out a plan. I got a Sonos Amp paired with the excellent Q Acoustics 3030i speakers. The Amp, as a part of the Sonos ecosystem, can be grouped with the Arc surround setup with seamless streaming between the two. Sonos devices are assigned to logical rooms and then rooms are grouped together. The Q Acoustics 3030i are excellent bookshelf speakers with a wide dynamic range, clarity and low end grunt. They would not jam my smallish living room and look great.

I have to mention here that I do not have any trouble with the so called “Wife Acceptance Factor” or WAF for short in AV circles. Many wives hate speakers in the living room, but not mine! In fact, she thinks good speakers and fancy audio equipment enhance the status of the living room as long as the wires can be sufficiently hidden – what more can an audio enthusiast ask for(other than an unlimited budget of course!).

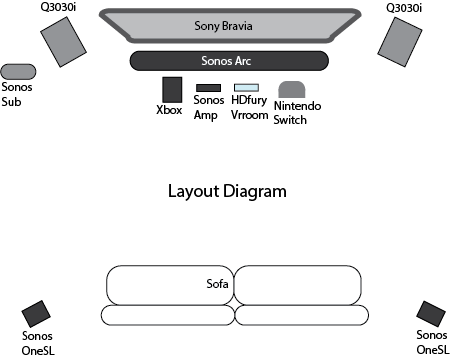
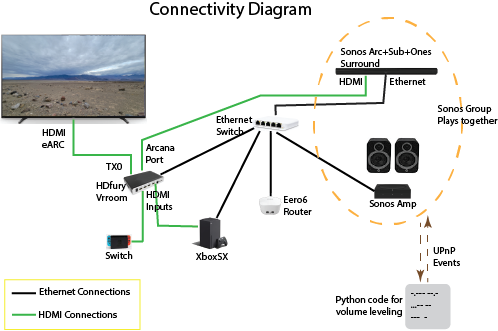
Monoprice 14 gauge speaker cables and Perlesmith speaker stands were other accessories in my kit. Sonos offers the ability to group speakers together and play the same music across all speakers in the group. These can be in the same room or spread across multiple rooms. What I did was to group the Amp and Arc surround setup into one group in the same room. Additionally, I ethernet-wired the Arc and Amp to the same switch so their wifi is dedicated to the proprietary SonosNet mesh for music streaming and speaker coordination. This resulted in the Q Acoustics to act as kind of front left and right speakers augmenting the Arc soundbar with dramatic results and zero sync delay between the two sets of speakers. Following is a schematic diagram of my layout.

The space behind my sofa is a walkway so I can’t keep the surrounds behind. There are a few additional items visible in the layout, mostly self-explanatory. However, the HDfury Vrroom device needs a bit of introduction. I had switched sometime back from the Samsung to a Bravia OLED TV. The Bravia XR models have outstanding picture quality, color vibrancy and upscaling of HD content to UHD. Their sound quality is also surprisingly awesome. The TV has some surround sound capability and subwoofers with sound emanating from the screen itself. Something that Sony calls Acoustic Surface Audio. This means that I can avoid using the Arc surround for regular TV shows, News, series and kids cartoons. Having surround continuously on is a headache and consumes a lot of power. So what does all this have to do with the Vrroom device?

It turns out that the Bravia cannot do 4k at 120Hz refresh and also support Dolby Vision at the same time due to EDID buffer limitations. Dolby Vision is a step up from HDR10 and really makes the movies pop and games as well (like Forza Horizon 5) are beginning to support it on the Xbox (PS5 does not support DV but has something related called HDR Tone Mapping for games). The HDfury Vrroom is an extremely capable and flexible device to manage HDMI switching, routing, scaling and other signal management. Using it I was able to spoof to the Xbox that the TV can support Dolby Vision at 4k 120Hz and enable LLDV (Low Latency Dolby Vision) where the player, Xbox, is doing the tone mapping. The Vrroom can then map the LLDV signal to custom HDR10 dynamically, resulting in equivalent results to native DV but on an HDR10 display! This is an amazing capability useful for many TVs (mostly Samsung) and Projectors that lack proper DV support.

Following is the wiring and connectivity layout for my setup.

As you can see I am also using a tiny Python program hack over a Sonos limitation with group volume control. I am using the excellent SoCo library that provides a Python interface to the unofficial Sonos UPnP API. It is fun to be able to play with consumer electronics using Python. More on that below along with some points and observations.

  • No audio delay/reverb. Arc and Amp sounds are fully synchronized. No lip sync issues with the TV. I suspect this is because both are connected over ethernet and to the same switch and both are HT components.
  • The Arc soundstage is now greatly expanded with with front L/R speakers and the midrange and mid-bass response opened up.
  • Dialogue is clear and audible.
  • There was slight hint of sibilance and brightness taken care of by Treble -2. This actually mellowed down after the Q Acoustics got over their break-in period.
  • I set Arc surround volume level a little lower than Amp volume. Sub audio, surround audio and height audio are individually boosted. This helps keep midrange from being overly bright as Arc and Amp phantom center are both producing it.
  • Kept surround music mode to Ambient with reduced level.
  • This setup work really great for both music and movies. There is a significant difference for movies. It is almost like a whole added dimension just opened up.
  • For music, the Q Acoustics is presenting me with tones that I seem to have missed earlier. It complements the rest of the Sonos speakers nicely without standing out. I think there is a base overlap between the Qs and Sub. This is slightly noticeable in the mid-bass region though does not annoy me. I have plans to throw Dirac Live into the mix during further future experiments.
  • Since the Qs are 75 watt speakers and the Sonos Amp can drive 125 watts RMS per channel, I kept volume limit on Amp to 75%. I had tried 60% initially but that led to low volume and a bit of midrange clipping/distortion once slider was pushed up.

There were a few problems.

  • Controlling group volume in the Sono app is clunky. I have to do it with the app and adjust relative Arc and Amp volume as well. The percentage relation does not hold always when changing group volume.
  • Cannot have permanent groups without 3 rooms.
  • If I use TV remote volume, it only changes volume of Arc setup, not group volume.
  • No Trueplay room correction on the Amp but it is great nevertheless. As I mentioned above, Dirac Live experimentation is planned for future.

Python offered a solution.

The volume issue was most painful. It is hard to always reach for the mobile phone, unlock it and control volume via the app. Eventually I figured that I can subscribe to Sonos UPnP events for volume changes and then adjust Arc and Amp relative volumes. The SoCo Python library makes it painless. Hacked up a Python program to achieve that. This way the TV remote effectively controls group volume, problem solved. I have to keep the program running on a laptop though while using the systems.

from queue import Empty
from soco import SoCo
from soco.events import event_listener

def set_volume(spkr, base_vol, diff):
    if base_vol >= 100 - diff:
        spkr.volume = base_vol
    elif base_vol < diff:
        spkr.volume = base_vol * 2
    else:
        spkr.volume = base_vol + diff

diff = 3
amp = SoCo("x.x.x.x")
arc = SoCo("x.x.x.x")
set_volume(amp, arc.volume, diff)

sub = arc.renderingControl.subscribe(auto_renew=True)

while True:
    try:
        try:
            event = sub.events.get(timeout=5)
            if 'volume' in event.variables:
                vol = int(event.variables['volume']['Master'])
                set_volume(amp, vol, diff)
        except Empty:
            pass

    except KeyboardInterrupt:
        print('\nUnsubscribing\n')
        sub.unsubscribe()
        event_listener.stop()
        break

Of course the script is quick and dirty. It would be better to use the events_twisted callback interface. More enhancement like rule files are possible. It is also possible to have flexible group definitions which can provide a way to define permanent groups and relative speaker volumes within groups. Maybe even predefined EQ settings for different modes. Use mDNS for example to use device names as opposed to hardcoding IP addresses etc.

Finally I am enjoying both music and movies with a quality theater experience though I can still perceive room for improvement in future. I am finicky with audio due to a nagging OCD.

Boot Environments on Linux

I have been busy working on a bunch of exciting tech last few years with very little time for anything else apart from family. The typical startup grind. However, better late than never, I found a bit of opportunity to write up on something I have been hacking on (along with couple of others) and have been put out in open-source.

We have seen the concept of Boot Environments initially with ZFS on Solaris. Because the filesystem supports snapshotting and cloning, it is possible to create another virtual copy of the entire root filesystem as a clone of the currently booted root. It is then possible to mount that clone, upgrade packages inside that prefix and finally reboot into the upgraded clone after adding a grub entry for it. There are several advantages of this approach.

  • The operation of cloning the filesystem is instantaneous due to the Copy-On-Write design. There is no need to perform a costly copy of the entire root filesystem image.
  • During the upgrade the box is up and running and in production use because the currently booted environment remains untouched. The only downtime is when we reboot.
  • Since the currently booted environment is untouched the upgrade is very safe. Any failures or breakage during upgrade would mean destroying the clone and starting again from the beginning, in the worst case.
  • If we discover issues after booting into the updated clone, we can easily reboot back to the previous working Boot Environment.
  • Because of the COW design the upgraded clone only occupies space for the packages that were actually upgraded. Unchanged package content is shared with the parent dataset of the clone. This un-duplication is space efficient.
  • It is possible to have multiple boot environments on the box without having to worry about partitioning.
  • Because of the pooled storage design all datasets or clones share the same pooled storage space avoiding hard partitioning and fixed space allocation headaches.
  • Multiple boot environments are *extremely* useful in a testing and development setup where multiple software releases can reside on the box. To select a certain release for testing or experimenting, just boot into the appropriate BE (Boot Environment). Messing around is also easy. Create another BE from the current one. Boot into it and mess to your heart’s content. The original BE remains safe as long as you do not screw the disk or the bootloader of course!

I can go on some more but lets draw a line here. Now, we wanted to get the same stuff on Linux. It is possible given we have the nice beast called Btrfs. Btrfs, till sometime back has been controversial and criticised quite a bit. However, I noticed that it has been maturing of late. Number of serious issues have gone to negligible. Many fixes and improvements have come. All of the rants I found via Google were at least couple of years back and mostly were older than that. This gave us the confidence to start testing it and eventually use it in the products my employer sells. We did have to go through a learning curve getting to grips with the nitty gritties and idiosyncracies of Btrfs. It created a bit of initial teething troubles and deployment issues but it was manageable.

I looked around to see if the BE capability already existed but found none. I came across things like apt-snapshot or Snapper which are similar but not quite the same. Our hard requirement was that upgrade must not touch the running environment. So, in the end, we came up with our own scripts to implement the BE feature.

Since our Linux environment is based off Ubuntu the root subvolume is ‘@’. We then create a writable snapshot of ‘@’ as our initial root subvolume and that becomes our first BE. Subsequent upgrades creates writable snapshots of the current booted subvolume. In addition, the ‘@’ subvolume is always mounted under /.rootbe in our environment and all the BE subvolumes and mounted under it including the currently booted one which is also mounted at ‘/’ obviously.

Btrfs has the concept of a default subvolume, however we do not change that. Rather, we just use the ‘rootflags=subvol=…’ parameter. This allows us to have the primary grub menu in a single place and access always via /.rootbe/boot/grub/grub.cfg.

The entire show is managed via two shell scripts. One to do the BE management (create, delete, list etc.) called ‘beadm’ and one to upgrade the current environment by creating a new BE called ‘pn-apt-get’. Both of them are available at this url: https://github.com/PluribusNetworks/pluribus_linux_userland/tree/master/components/bootenv-tools

The ‘pn-apt-get’ script creates a new BE and runs ‘apt-get dist-upgrade’ inside a chroot. It assumes that the ‘sources.list’ has been setup properly.

In addition to all this I wanted to optimize the space used by having dpkg Not replace files in a package being upgraded if the new file is identical to the one already installed. I needed to add a small Dpkg patch to achieve this: https://github.com/PluribusNetworks/pluribus_linux_userland/blob/master/components/dpkg-ubuntu/debian/patches/skip_unchanged.patch

All this allows us to do safe, fast, in-production upgrades and only incur downtime during the reboot.  One quirk I had to deal with was BE space usage reporting. I had to turn on the ‘quota’ feature of Btrfs to get accurate space accounting even though I do not use quotas in practice. This also meant that I hit a couple of obscure quota bugs (especially after subvolume delete) in the 4.4 Ubuntu Xenial kernel release that we have been using (logistics issues). To work around I found it sufficient to do a periodic “quota rescan” every few hours.

Little Oxalis caught on Galaxy S6

The Galaxy S6 camera is close to the top end as far as mobile cameras go. It can get nice close ups. Here’s a wallpaper grade close up of a cluster of Oxalis or Wood Sorrel with a tiny flower just after a sprinkler watering. I have edited it lightly with Seashore. I am placing this under Creative Commons license.

Oxalis_scaled


The TATA Nano Comes Home

Picked up the Nano Twist, primarily for wifey. I used to have a dim view of the Nano. I never considered it in my interest list of small cars, buying was a big NO NO. My wife has this minimalist view. She likes to go for the minimum requirement for her needs. All she needed were 4 wheels to go from point A to point B in relative comfort as opposed to 2 wheels. The Nano fitted that operating model, so she forced me to take a test drive. That changed my whole opinion.

It’s been more than a month since I picked it up and I am loving the little wonder. It is a fantastic car for crowded city roads. Easy to drive, almost like a Go-Cart! Has all the creature comforts. Great fuel efficiency. Smooth ride quality. Little but peppy engine, quick on it’s feet. Electronic power steering smooth as butter. Pedals are light on the feet. Spacious and comfortable interiors, sits 5 average-sized adults with ease. There is good legroom and under-thigh support. Great ground clearance. I am yet to scrape the bottom, even when going over mountain sized speed breakers. Smallest turning radius, can do next to impossible U-turns in a single turn. No reverse and forward monkey business. If you do not believe me, take a test drive. Super easy to park. What more does one ask for? The regular service schedules are infrequent. In addition TATA has a scheme whereby I paid a small amount up front and the next three year regular services are free as in free beer! Probably I will have to dole out some small amounts for a few odd consumables. Combined with high fuel efficiency and low insurance fees, for a vehicle of this segment, it represents exceptional value for money.

The engine sound has been tamed down. Also it now sounds more car-like rather than the earlier commercial vehicle sound. There are a few minor cons. Like the outside rear view mirror is too small. There are quality issues with the finishing on some of the panel edges, though panel gaps are consistent. While I get curious stares on the road, the biggest problem is I do not get respect on the road! I am used to driving my usual SUV and that gets ample respect like a gorilla. On the Nano suddenly, I am a mouse instead of a Gorilla! However the Nano makes up for it by it’s agility. Think of Stuart Little on a busy road. The other big con is the lack of front disc brakes. Braking from speed requires a harder push, which can take some getting used to . However these cons do not take anything away from the value proposition that the Nano represents.

Apart from disc brakes, I do wish that TATA comes out with an automatic transmission variant, probably using the AMT from Magneti Marelli. That would be an excellent addition. It would push the price up, but no harm in having a high-end Nano with a whole bunch of bells and whistles. The age-old marketing technique: attract the customer with the lower-end cheaper models to the showroom and sell them the high-end models 🙂

Anyone looking at cars in the same segment or a second hand Santro or some such, definitely need to give the Nano a serious consideration. One cannot get better value for money that this vehicle in it’s “Twist” Avatar. This vehicle definitely deserves 10x the sales that it is unfortunately garnering today. This is the car that TATA Motors should have launched on day one, but as we all know, Indian car manufacturers like to use customers as test engineers, sometimes with disastrous results! Also for the Nano’s woes TATA got the initial marketing, product positioning and branding wrong.

The children are really excited with the Nano. The little ones with the “Little One”:20140714_191724_Fotor