
In my previous article on my experiments with my hybrid Sonos setup I alluded to trying out isolation pads for subwoofers. These are typically a dense foam base which has a soft fabric covered plywood sheet on the top to hold the subwoofer. The idea is to absorb speaker vibrations and prevent them from transferring into the floor and causing resonances.
Question is do they make any sense or are just snake oil just like so many other stuff in the audio world. The only way for me to determine this was to get a couple of these, test and measure and return if they made no difference. So, did they make a difference for me eventually? Yes, I am keeping those. Should you get one ? It depends!
In my hybrid Sonos setup I have two Subs. One a Sonos Sub and another an OSD Trevoce 10” Sub carefully DSP tuned to complement the Sonos sub. Even after lots of tweaking of settings and DSP, furniture and speaker adjustments there was a slight nagging boominess to the bass. Costly room treatments were not an option, especially in a rented apartment. After researching a bit, I ordered two Auralex Subdude II isolation pads which subjectively, made the boominess disappear with tighter bass. However, I wanted to measure with REW. REW is not subject to placebo effects so I hoped to get an objective picture.
Note here that the Sonos Sub has two opposing force-canceling drivers resulting in negligible vibration of the subwoofer cabinet but some energy still transfers to the floor from direct contact. The OSD Sub has passive radiators but they are not force-canceling, so it does vibrate. Note also that I have a carpeted floor so carpet should absorb some vibrations from the subs. I was interested in the Decay graphs from REW to understand the extent of resonance/ringing per frequency range. I decided to use the spectrogram graph type as it shows decay times independent of peak volume levels. My measurements were all volume matched to 75Db SPL for Pink Noise. The spectrogram is a view of the waterfall 3D graph from above.
I took two measurements, one without the Auralex pads on both subs and one with them. My first measurements showed reduced decay times, albeit small, but across the entire frequency range! This was very surprising to me. I was only tweaking the subwoofer setup, so how can it impact the higher frequencies. I could not believe those results and was confused. I could not clearly recollect if I had done something odd or maybe even changed the settings in the middle, or it could be differing background noise. So, I used the setup for a few days and took another measurement on another day at a time when things were uber-quiet and there was only me at home. I took two measurements in quick succession with and without the pads and was very careful to not affect anything and ensured background noise was minimum. I got the same result! So, I measured yet again and once again got the same result!
The following is a spectrogram overlay that compares the decay times. Click on the image for a bigger clearer picture. All measurements were taken from the Main Listening Position or MLP for short. I used a UMIK-1 and it was pointing straight. I did not use the 90 degree config. I will try that another day. Maybe, it will pick up the reflected sound better and show a bigger difference.
Spectrogram boundary in white = measurement without Auralex pads. Inner rainbow colored spectrogram = measurement with the pads.
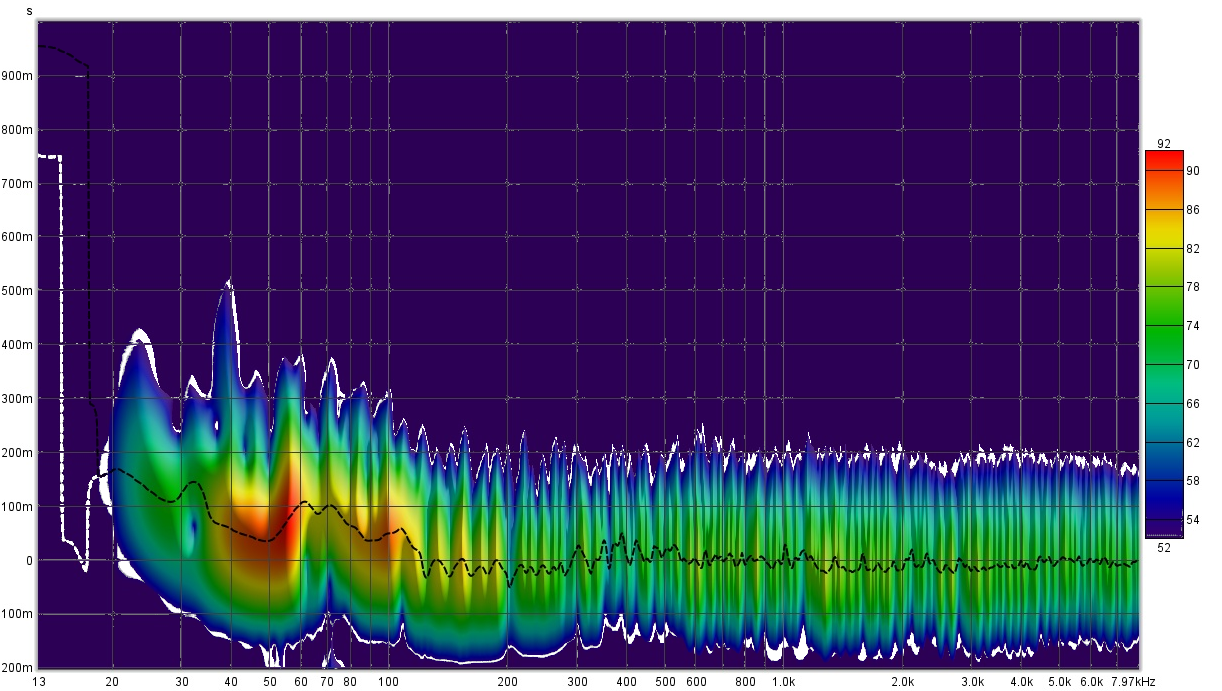
The vertical axis is decay time. It is clear that the inner spectrogram has smaller decay times across the frequency response. The benefit is small, but it is present even with my carpeted floor and subjectively audible. Human hearing is very sensitive to timing changes, reverb, echoes etc. So how is this working? I suspect a few things:
- The Auralex are doing their job at the lower frequencies.
- REW does a frequency sweep so, I suspect the previous frequency’s decaying tone is affecting the next in the range. But this still does not explain the benefit at the higher frequencies much beyond the time of the lower frequency decays.
- I live in an apartment, on the second floor and the building is made of wood and synthetics (drywall for eg). There is no concrete. So vibrations, even minor ones are transmitted easily.
- The subwoofers are kept just next to my bookshelf speaker stands that have metal spikes into the carpet. So, the isolation pad foam are likely absorbing higher-frequency vibrations through the carpet transmitted to the floor via the stand.
So, finally the question, should you get an isolation pad? Considering the following questions can help:
- Do you live in an apartment? If yes then it can make some sense to avoid trouble with your neighbors.
- Is the building made of concrete or wood? Obviously it makes more sense in a wooden construction.
- Even in a concrete building do you have a wooden floor?
- Do you have a carpet? Wooden floor with no carpet and it makes more sense to get an isolation pad for your sub.
- Are you living in your own house, possibly concrete construction and have a carpet with audio setup on the ground floor? Though it will make hardly any difference to the sound, you can still get one for mental peace, especially if you have OCD like me!!
- Do you have room treatments like acoustic panels and bass traps? Please still buy these isolation pads because they are another fancy item to talk about and show off your deep knowledge of room acoustics to friends and family…
Caveats
Well, the last two jokes apart, there is some sense in getting these pads based on your situation as is clear from the remaining points and the earlier discussion. However, one thing I could not measure is how much floor and wall vibrations were present before and after. Measuring that accurately with enough sensitivity requires expensive equipment. The free smartphone based apps are likely not sufficient here. Subjectively, listening to music from outside my apartment, the low frequency effects did sound lower at the same volume. Also, my measurement microphone was horizontal, pointed towards the speakers. I later learned that it is recommended to point it upwards and use the 90 degree calibration file to better assess room effects.
