
Obsessed with quality
When I was in my early teens, I remember developing a taste for the sound of music. Theaters and concert halls would mesmerize me not by the large screens or stages but by the sound and the large speakers! I was more interested in the way audio was being produced and delivered. If it was audio, it had to be well-presented. I would balk at the tinny or boomy sound of small cassette players and two-in-ones. It was the same thing with my father. If he did not have the right equipment, he would not listen to music, period!
My first experience with hi-fi was amplifiers and speaker enclosures designed and built by my dad. Electronics was his hobby and I would watch intently, and sometimes help as he painstakingly soldered components, screwed boards, cut and drilled plywood etc. He ended up making several mono amps and speaker boxes for friends and family. Unbeknownst to me he was saving up all this while for something bigger. It was an exciting evening when he walked in with three big boxes and unboxed the Sonodyne Uranus. A top-tier component hi-fi system of that time.
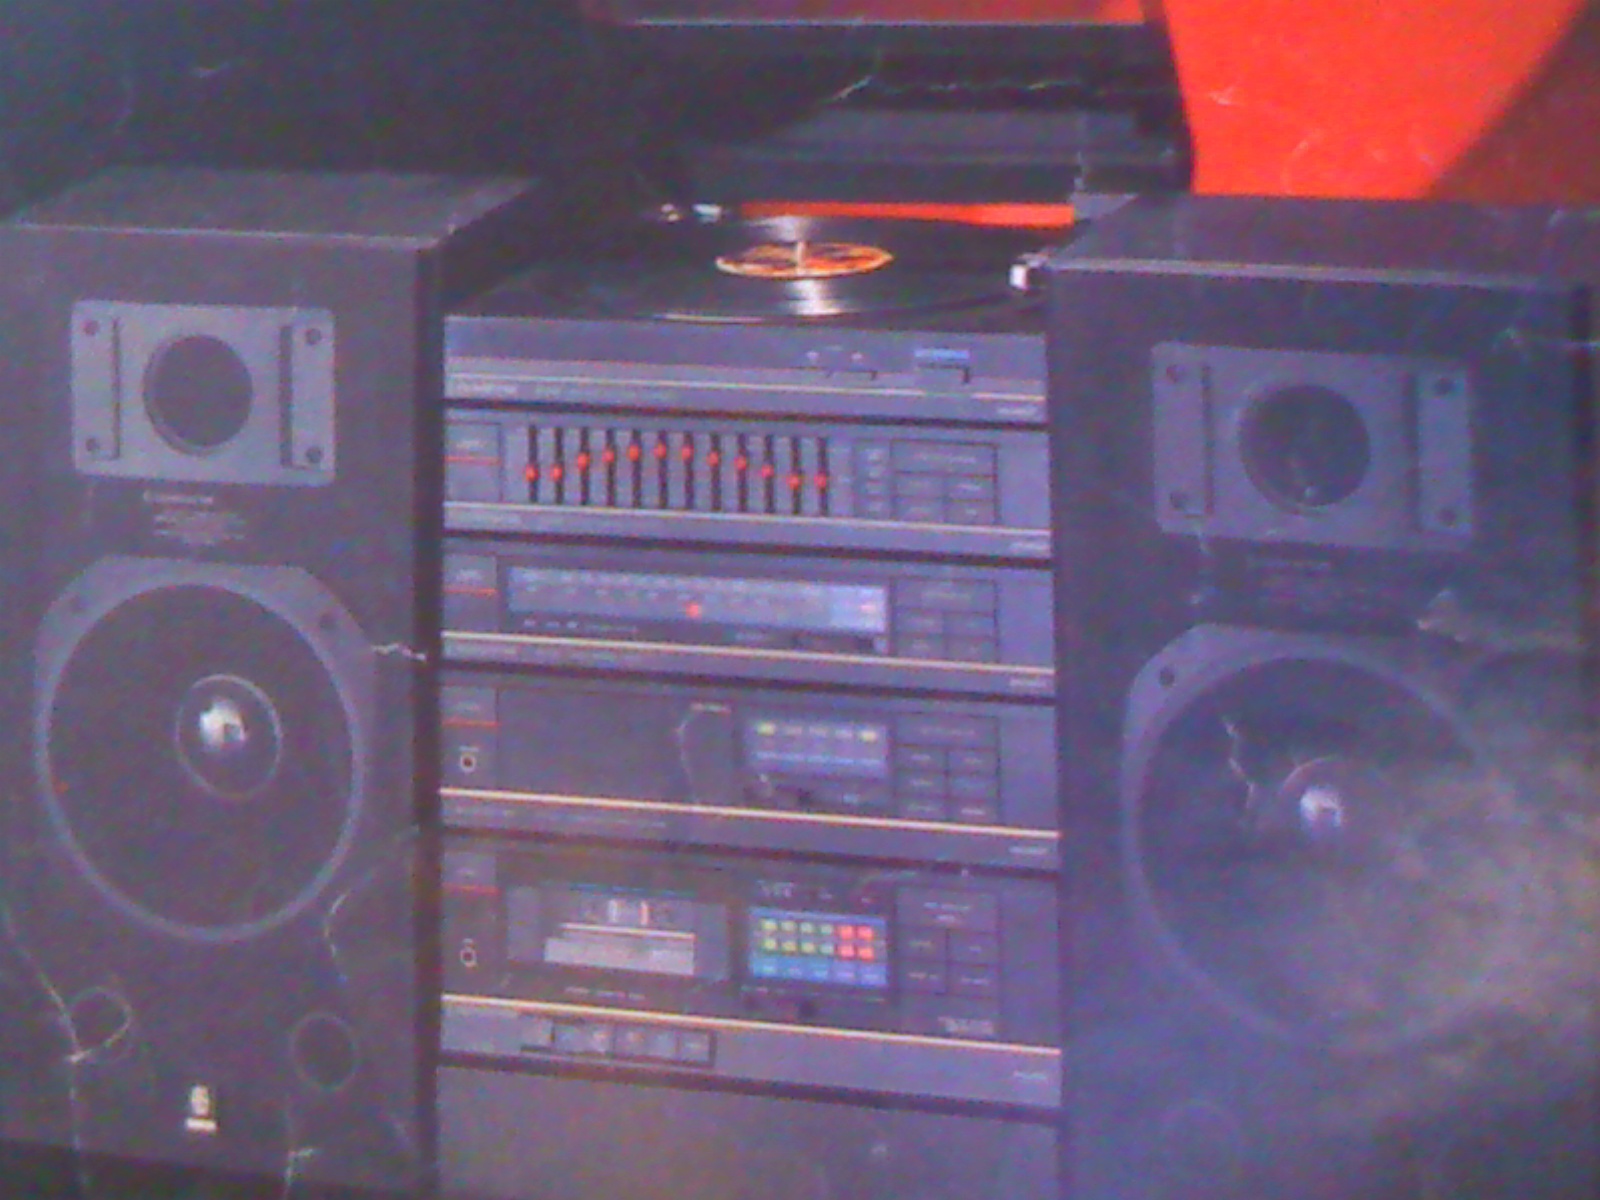
It had a discrete cassette deck, 12-band graphic equalizer (+/- 12db), AM/FM tuner, turntable and a power amplifier employing the STK 4131-II chips. It also came with two or three way bass reflex speakers. That audio obsession has been with me to this day. I am unable listen to music unless the presentation reaches some level of finesse. I have gone years without listening to music when situation did not permit me to invest in proper audio equipment. A cursed obsession you might say! That also means then even when I acquire equipment, I spend a lot of effort in tweaking the systems and the rooms in search of qualitative improvements. While the effort is large, the rewards are large to my ears as well. I find myself listening to more music as I get to that level of desired perfection. It is an inflexion point of quality and diminishing returns given a certain budget.
Measure – tune, measure – tune, measure – tune
Coming back to my hybrid Sonos system of the present, it was great but there seemed to be something missing. Playing back music from 90’s era movies, it seemed the drum beats were weak. The punch was missing. I cannot listen to music like that. At that point I realized that I had to measure it. A bit of recollection and research led to the following:
- Minidsp UMIK – 1 calibrated microphone
- Amazon Basics adjustable boom microphone stand
- Open source Room EQ Wizard software
- This excellent beginner’s guide: https://www.youtube.com/watch?v=Ev1bSSL8tRA
- A Laptop
I needed some additional stuff since I had to connect my laptop to the Sonos system. I could connect it to either the Arc or the Amp, but in either case those needed HDMI ARC. Sonos provides an optical to HDMI ARC converter cable. So, I had to figure a way to convert laptop USB to digital optical. Such a thing was hard to find but I eventually found a USB DAC that replicated the USB digital signal onto optical as well as line-out. So these were the additional things I had to get:
- Sonos optical to HDMI adapter – Included with Sonos Arc
- Signstek USB DAC
- A USB C to USB B cable
- An HDMI cable
So, I was able to connect the DAC to my laptop’s USB, connect the Sonos optical to HDMI cable to the DAC’s optical input on one end and the HDMI cable on the other end. The DAC replicates the USB input signal to the optical input as well making the optical input also behave as an output. Finally, I plugged in the HDMI cable into the Amp’s HDMI port. Playing youtube confirmed that it works. Sound was coming through the Amp’s speakers and there were no lip-sync delay issues.
The first hiccup came when I grouped Amp with active HDMI-in with the Arc. The Arc sound was delayed resulting in a bad reverb! This is the Sonos 75ms group audio delay. Interestingly, the group delay is not present when connecting via the Arc’s HDMI port and grouping the Amp. After a bit of fidgeting I got rid of the delay by adjusting the Amp’s “TV Dialog Sync” setting. I could’ve just used the Arc’s HDMI port but messing around leads to more learnings.
Anyway, I stepped through the video and made my first test measurements to understand the process and verify that everything works. Now, I was ready to do some real work. First I had to get my surroundings as quiet as possible:
- Close all doors and blinds
- Shut off the water dispenser and refrigerator
- Somehow get unhappy wife and kid into a bedroom and get them to be absolutely quiet
- Pray the neighbors do not make sudden noise like closing a door loudly
- Pray no vehicles enter or leave the apartment parking
- Pray neighbor’s dogs do not bark
- Pray …
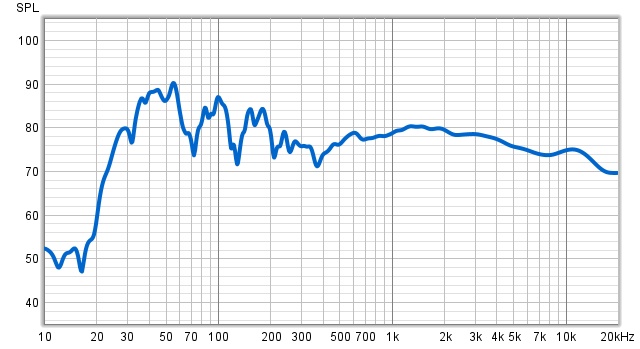
My first measurement was only with the Arc + Ones + Sub setup. The Amp was not grouped and not active. This setup was tuned with Trueplay:
z
As you can see. I have a bad living room in terms of acoustics and Trueplay room correction DSP is no magic. There is a lot to be desired in the Bass frequencies below 200Hz. The peak at around 50Hz looks like a room mode. Now here, I have to mention that I am not looking for a flat frequency response. There is some controversy around this topic but to me a flat frequency response is incredibly boring. It is more desirable to go for a Harman Curve. While Harman curves were initially designed for headphones we also have them for loudspeakers. Example: 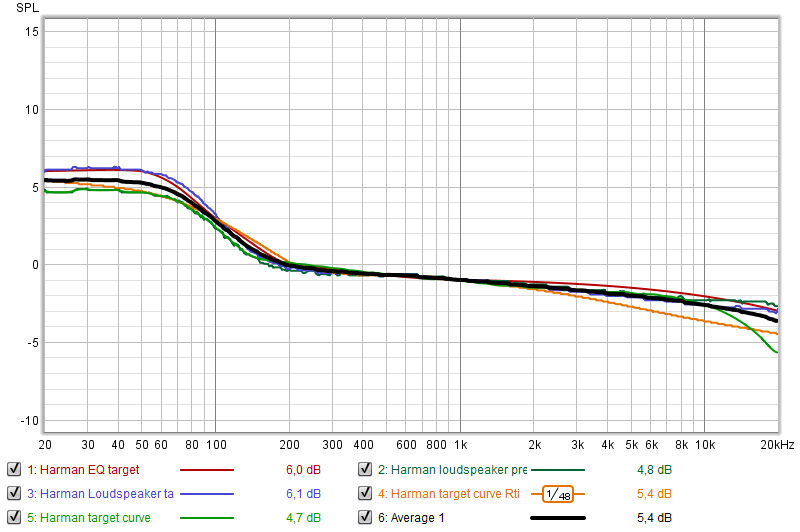
Next I measured the Arc+Amp grouped setup with Amp crossover set at 96Hz.

Not much difference in the bass as the Amp does not have a sub. It only has the Q Acoustics 3030i bookshelf speakers. But 100Hz – 200Hz is a little more fuller and the midrange from 1KHz to 4KHz is boosted resulting in clearer dialog in movies. I figured maybe letting the Q Acoustics handle a bit more bass would help with the dip at 60Hz to 100Hz. They are rated till 46Hz. Reducing the crossover to 70Hz yielded this.
x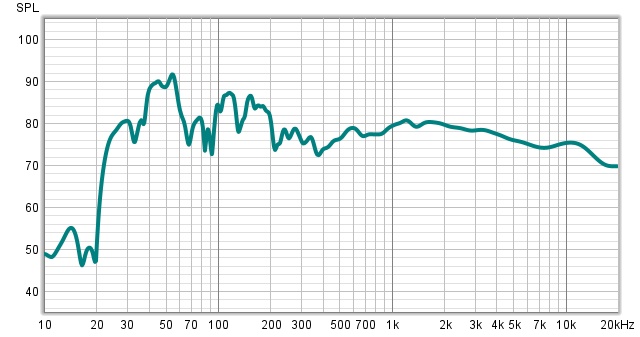
Notice the little bump from 70Hz to 90Hz. So the Q Acoustics were helping a bit in that range. Also the spike at around 50Hz has reduced a bit. It is looking more like a Harman but still quite jagged. At this point I was out of options to tweak further with the existing system as Sonos has limited EQ capabilities. Two further next steps were possible:
- Adjust room setup – my living room was congested and needed some cleanup and re-alignment.
- Add a subwoofer to the Amp, preferably one with a built-in parametric EQ so I can adjust the response.
Eventually, I did both. The sofa was better aligned with more frontal space. Got rid of some old stuff, repositioned some other furniture. I saved up and splurged on the OSD Trevoce 10” EQ DSP Subwoofer. This subwoofer comes with some advanced DSP features including a 25-band parametric equalizer. Optimal Speaker Design or OSD for short, typically designs outdoor speakers but recently have been getting into home theater audio. While SVS is a more popular and respected subwoofer brand, I read some reviews of this less-known sub, especially the sound and vision review and grabbed it for its DSP features. I was not disappointed. SVS subs only have a 3-band parametric EQ and in the end I needed to use 12 bands on the OSD to get some results.
In the meantime my wife was a little upset with a second sub in a small apartment and thought I am losing my sanity with the repeated microphone setup and crazy measurement sessions for hours. That the speakers made all sorts of booming and squealing sounds during the frequency sweeps did not help! To make a long story short after days of tweaking, measuring, tweaking and countless parametric EQ curves later I had something which looked better on the graph and sounded better. Towards the end of the measurements, for the first time I could hear some glass items rattle. I was getting better bass extension down to 25Hz, thanks to the OSD Trevoce. The next graph shows the dual-sub setup with earlier response – deep green and new response – light green.
x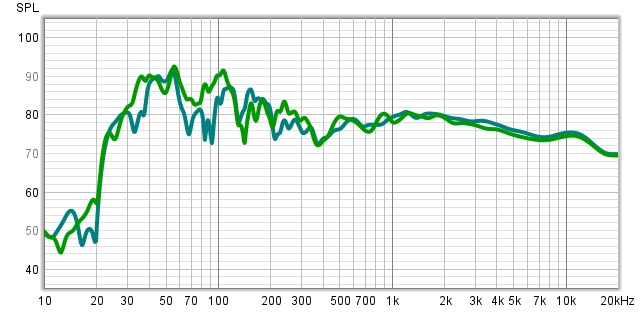
As can be seen, bass response is fuller and meatier with extension down to 25Hz. I had to adjust the Sonos sub level down by -1 to avoid a bad down-spike null at 46Hz. It seems at some volume 46Hz frequencies from both the subs coupled with room resonance were canceling each other out and losing energy. Just a bit of level adjustment gets rid of that effect. But I still had boomy sound.
The graph in light green is still not great however, even though it is closer to my desired room response curve. The peaks that 55Hz and 106Hz are too forceful. Also, while listening, it sounded quite boomy and reverberating along with too much sound pressure even at lower volumes. At that point I realized that I had the “Loudness” feature enabled on the Sonos Amp. This loudness is a DSP that boosts certain frequency ranges to improve listening at lower levels. In this case though my Subwoofers DSP was already doing quite a bit of work, so adding “Loudness” was an overload. Maybe okay for an all-singing, all-dancing party mode but not for general listening. Turning that off yielded a much better result with boominess significantly reduced. The next graph shows same setup with “loudness” off and Sonos amp crossover at 110Hz.
The bass is better controlled but we do have two drops at 73Hz and 128Hz. The next graph is a comparison, loudness on – violet, loudness off – deep blue/indigo.

You can see which frequency ranges are boosted by the Sonos “Loudness” feature. At this point getting rid of the two drops at 73Hz and 128Hz while still keeping bass under control will require room treatment with sound absorbing panels and bass traps to control resonance. I am not inclined to do that in a rented apartment, especially when I am going to move in future.
A better view of the boominess or sound ringing in a room can be seen via a 3D waterfall graph which shows the frequency tone decay over time in ms. I generated a Waterfall Overlay: White – Loudness OFF, Orange – Loudness ON

We want to have a decay time (Z-axis) to be as low as possible, less than 300ms ideally and at least less than 450ms. In this image you can see that the Orange overlay with loudness ON had much more forceful bass and worse decay times compared to loudness OFF in white. We still have some bad decay around 40Hz and nearby in the white graph. It is just my living room resonances at certain frequencies that can only be dealt with by bass traps/absorbent panels.
There is another thing here. Most subwoofers vibrate. Some like the Sonos Sub and some KEF subs have force canceling opposing drivers that have minimal vibration, but still it is not nil. The OSD sub that I got does vibrate quite a bit. All that vibration passes to the floor and walls especially in an apartment and especially in one which is constructed of wood and synthetic materials. That contributes to room resonances/ringing and annoys neighbors. So, I plan to get subwoofer isolation bases that absorb vibrations using an acoustic foam layer and make some measurements using those.
Needless to mention, I learned a lot during this exercise and thoroughly enjoyed it. It is surprising how little changes can have a big impact and how it can be tricky sometimes to balance dual-subwoofers especially if they are of different makes. However, the real enjoyment is the resultant audio quality when you start to re-discover your existing music collection and start to discern sound effects and instruments you have not noticed before.
